Pump Up Your Box Spring – Just Add Legs to It!

Our Bed.

We FINALLY got our memory foam bed in… It took forever to get here, but all I can say is that patience is a virtue – and we definitely got to practice it while we eagerly awaited the mattress’s arrival!

Our originally idea and inspiration... Maybe someday! Either way, I can't wait to get that beautiful comforter below it on the bed!

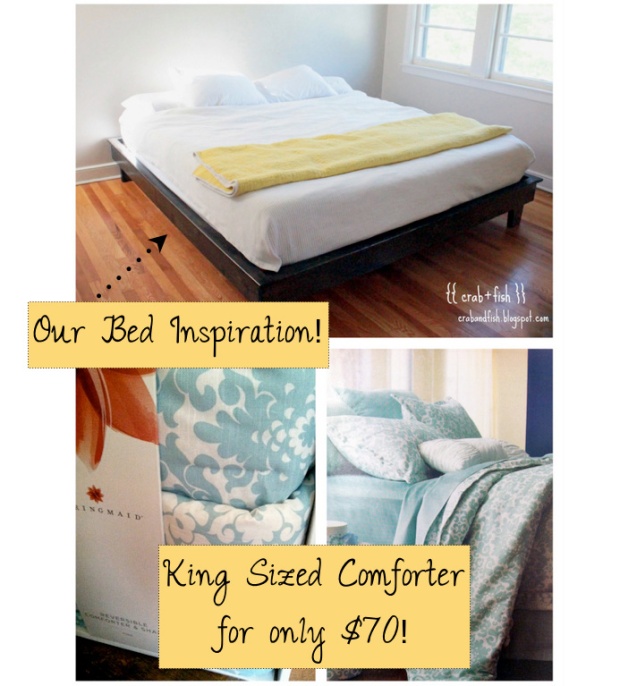
Our original idea and inspiration… Maybe someday! Either way, I can’t wait to get that beautiful comforter below it on the bed!

Originally, I had grand ideas on what we would do for the bed frame. I wanted a beautiful solid wood platform bed so badly; I even found a free plan online and everything. But I had to stop and be practical… It didn’t make sense for us to make that right now. We are in Washington, in an apartment, and will likely be moving within the next two years or so. The more I thought about it the more it became a bad idea for us to make the platform bed. Then I was simply lost on where to go next. We had a King size bed on it’s way – just no bed frame… So, I went to Pinterest! 🙂

The next plan of attack? Simply add legs to your box spring! *Thank goodness for Pinterest!* The bummer though was that original pin went to a dead site, so it made me brain storm somewhat. I thought it would be easy – that’s usually where I run into trouble and see Blair rolling his eyes at me (lovingly, of course!) – and in the end, it was in fact quite easy. Yay for a Pinterest idea going easily! 😀

boxspringidea

Our bed is finally in!

We bought our box springs off of Craigslist… sounds shady, trust me I know… but I found someone who was selling their’s for only $60 still in it’s original packaging – never opened! Score! And, honestly, you’d be surprised at how many people are selling their brand new box springs on Craigslist. Most of them seem to buy platform beds and no longer need them. Just make sure they come from a smoke and pet free home!

Click on the photos below give for some more details, but basically all we did was:

  • Screw Heavy Duty Top Plates to each of the box spring’s corners. *We have a split box spring so we used eight of these.*
  • Twist the Legs into the plates. *Make sure you use sturdy legs that can hold weight. The ones we used can hold 200 lbs. each.*
  • Put your bed on top!

*If you have a King sized bed, you consider getting a block of wood to place in between the center of the two box springs to support the middle section of the bed.*

Since we were kind of rushing when we put this together, I didn’t paint or stain the legs. At the moment, it doesn’t bother me that they are unfinished, but I’ll probably paint them down the road.

In the end, it cost us around $110 to do this project and about 30 minutes from start to finish. I’m in love with it and can’t wait till Blair is home from the field to be able to enjoy it too! Until then, I’m sure I’ll try to take up the entire king size bed – if that is even possible!

The next To Do on the bed is to cover the box springs with fabric so they can’t be seen! I’m using canvas drop cloths, so stay tuned for that post!

Lauren

P.S. Check out Pretty Pegs for cute furniture legs too! They are a little bit expensive for my taste, but definitely gave me some ideas for what I could do to our’s later on!

Part 1 – Redoing our Bedroom!

King Size Bed.

That’s where it all began. A Living Social deal too good to pass up came our way and we jumped on top of it. A memory foam mattress – king size- for $394? SCORE! And since then my mind has just been filled with endless ideas to make our bedroom some place we both truly love to be in!

Enter the inspiration – a platform bed inspired by Pottery Barn’s Teen Hampton Planked Platform Bed. When originally looking for ideas, I found this bed on the wonderful blog Crab & Fish and fell in love! And once I realized that the amazing Ana White had actually written up FREE in-depth plans for the bed, I knew Blair and I were in for a full on bedroom makeover!

bedroom redo

Below are some additional things I’ve gotten and done already in anticipation of the arrival of our mattress and making the platform bed.The bedroom makeover probably could have come at a better time, especially considering finals and block leave are coming up within the next week… But hey, a little procrastination never hurts!

bedroom redo color frame bedroom redo accentsbedroom redo before and after

Already Home Depot, Big Lots and The Dollar Store have helped me spruce up our bedroom so much!

And the costs so far for our bedroom makeover have been:

  • Redoing the nesting tables: $20.21 not including our Home Depot Military Discount (which, by the way, is 10% off)
  • Curtains and Curtain Rods: $15
  • DIY Bedside Flowers and Accent Pillows: $$3.50
  • King Size Comforter: $70 from Big Lots
  • Spruced up Frame: $3.70 for the spray paint
  • King Size Memory Foam Mattress: $394
  • Platform Bed: TBA – thinking $100 or less!

Grand total including the platform bed project: $602.91

Not too bad in my books! Check out the beautiful DIY Bedside Flowers I’ve already done and stay tuned for updates on this little adventure!

Lauren

DIY Bedside Flowers

Fresh Flowers.

There is nothing quite like getting beautiful fresh flowers. And then again, there is nothing quite like the smell and mess dead flowers make. So to be able to have them for a long time, I made a bedside flower arrangement to wake up to and enjoy!

If you’re a crafty girl like me, this project will only cost you about a dollar. The only thing I bought were the fake flowers from The Dollar Store – everything else I had on hand! Find the steps under the photo below!flowerdiy3

What You’ll Need:

  1. A Container *I used an old silver gravy boat I had hiding in a storage closet.
  2. Fake Flowers *I only needed one bunch! I found mine at The Dollar Store. Most of them are cheesy… but dig around! There are some good ones in there!
  3. Hot Glue Gun with Glue
  4. Wire Cutters *Way easier to cut the flowers this way!

What You Need to Do:

  • Prep your flowers by cutting them out of the bunch – make sure to leave the stems!
  • Bend and play with the flowers to get how you want them to look in the container. *This may take a while to get perfect – don’t worry! Once you like it, take a picture so you can duplicate it in the next step!
  • Take your hot glue, cover the stem of the flower and connect it to the container. Repeat this for the rest of the flowers. *Great thing about hot glue is that it’s super easy to pull up if you don’t like a flower’s placement!

And that’s it! Super easy, cheap and cute project to spruce up your bedside table!

Lauren

DIY: Chic Jewelry Holder out of a Old Window Frame!

My New Jewelry Holder.

Here it is! I love it and it covers up the breaker switch box!

Here it is! I love it and it covers up the breaker switch box!

A couple of weeks ago when Blair and I were organizing our apartment, he broke the news to me about a newfound addiction of mine.

Apparently I have a lot of costume jewelry… and keeping it in a brown cardboard box was no longer appropriate.

So being the awesome man and husband he is, he decided to help me out on creating a totally adorable and chic jewelry holder made out of an old window frame!

Using an old window frame we had on hand (Thank you, Black family!), an old pillow case with a rad print and some newly purchased chicken wire from Home Depot, we both finished this project with a huge smile on both of our faces. We LOVED the finished product!

So I want to share it with all of you! The steps are below in a new photo format I’m trying out! *Fingers Crossed* Just click on the first photo on the left to get started!

Enjoy and happy crafting!

Lauren

Steam Cleaning: The Only Way to Clean a Fridge

The Fridge.

thenandnowjpg

I purposely made this photo smaller… Not only does the dirty spot gross me out, but it’s also just straight up embarrassing!

It was nasty. Something spilled and it was a terrible sticky mess to clean up. At first, I scrubbed with a sponge to get the residue picked up, but after having no success at doing so I pulled out my handy dandy Steamer.

Honestly, I wouldn’t be posting this for people to see unless I really truly believed in Steam Cleaning. It works wonders while sanitizing and I’m not too sure why it didn’t click until now to use it on and in my fridge. After all, I use it on everything else in the kitchen, bathroom and practically the whole rest of the apartment… I even use a Shark Steam Mop on our floors!

Anywho, the first thing you’ll need is a reliable steamer. I use a Scunci Steamer and I love it, but there are plenty of others on the market for less. Just make sure to read the ratings before you invest in one!

Some other supplies you’ll want are:

  • Old rag *Used to pick up the residue
  • Spray bottle filled with equal parts vinegar and warm water
  • Couple of clean rags *Used to wipe the vinegar & water cleaning solution up
  • Glad Press’n Seal *Optional – used to line any flat solid shelves for quick and easy clean-ups in the future!

Now, Let’s get started:

  1. Get your steamer filled with water and warming up.
  2. While the steamer is warming up, clear your fridge and get rid of any bad food.
  3. Remove any shelves and drawers that you are able to. *You essentially want a blank slate so you can get into every nook and cranny.
  4. Get to steaming! Steam any spills or touch residue first and wipe up with your old rag then get into the tight spots!

    IMGP6234-001

    Reason 1,687,392,735,084 why you need to steam clean. This is nasty and it totally brought out the OCD in me. We rent our apartment so I can only imagine what this fridge has been through…

  5. Once most of the loose residue is steamed and picked up, spray your cleaning solution all around and let it sit for a minute. Wipe up with your clean rags.
  6. Since I had a solid shelf, I lined the top of it with Glad Press’n Seal to help quickly clean up spills in the future.

And you are done!

final

Nice clean fridge! P.S. Glad Press’n Seal is shown in the bottom right photo!


Now that I’ve cleaned my fridge this way I can’t imagine doing it any other way. This is a must do for anyone! It makes cleaning the fridge no longer a hassle, but rather quite therapeutic – now, I don’t know about everyone else, but that’s my type of cleaning!

Lauren

DIY Entry Table

The Entryway.

entrypost
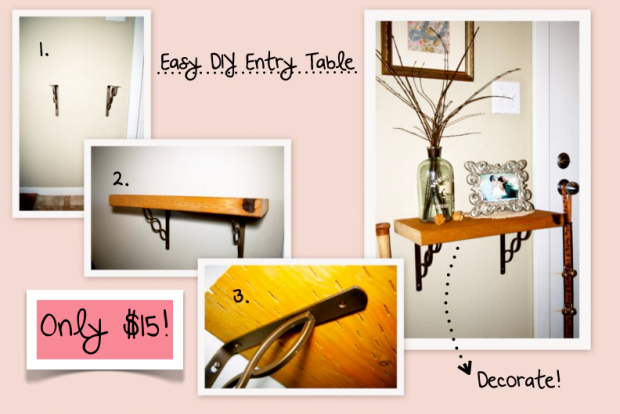
Whether you have a huge house or a small apartment, the entryway is what first makes it feel like home. So shortly after moving up North, it was our entryway that I got started working on ASAP.

At the time we didn’t have a single piece of furniture in the apartment and it was going to be over two weeks until we were, so you can say that it was this project that kept me sane! Being quick, easy and beyond budget friendly, this entry table still makes me smile when I stop and look at it. It is the perfect lil’ something that finishes the entry!

For this DIY, you’ll need:

  • 2 brakets – The ones I bought were $5 each and came with two wall screws and two top securing screws.
  • Piece of wood – I bought mine at Home Depot for only $4.01 from their “Cull Lumber” selection. Great buy and they will cut it for free!
  • Electric screwdriver – When I did this, we didn’t have ours up here so I used a good ole old-fashioned one. It worked perfectly, just took a little longer.
  • Measuring tape and pencil
15dollars

1. Screw the brakets into the wall – I measured 30 inches from the floor to the ceiling and marked the section lightly with a pencil. *Spacing between the brackets depends on how large of an entry table you are making. 
2. Center the precut piece of wood on top of the brakets.
3. Screw the tops of the brakets into the piece of wood to secure it.
4. Decorate! Make sure you have contrasting heights, knick knacks and a photo. This makes it even more personable and feeling like home.

Using our military discount at Home Depot (it’s 10% off), I was able to make this for less than $15. Not only was it budget friendly, but it also adds a unique touch to our entryway!

And, yes, we do keep a baseball bat by the front door… We’re old souls like that. 🙂

Lauren

A Nevada Sunrise Breakfast

Breakfast.

nvsunrise

Blair and I both love breakfast. Give us some pancakes, hash browns, scrambled eggs and sausage and we are set for the day. But after a fun night out with some friends, we woke up Saturday morning not in the mood to hang out by the stove flipping pancakes.

Insert: baked potatoes, eggs, bell peppers, tomatoes and some cheese. And Bam! – these things made the delicious breakfast dish we decided to name the “Nevada Sunrise”. Influenced by the recipe for an “Idaho Sunrise”, our version comes with different toppings than what is traditionally called for. I’ll be the first to tell you that I’m not too sure I’ll ever make the traditional recipe now that I’ve had ours. This bundle of breakfast goodness is the equivalent of home fries and a fried egg all in one. Make a couple extra potatoes on a baked potato night and you’ll be ready to go the next morning for a delicious and fast breakfast.

You’ll need:

  • Baked potatoes
  • 1 Red and Green bell peppers (chopped up)
  • 1/2 cup of grape tomatoes (halved)
  • 1 red onion (sliced)
  • Eggs (1 per potato)
  • Mexican cheese blend
  • Butter (1 tablespoon per potato)
  • Dried Parsley
  • Tabasco *optional, but you’re crazy if you don’t put it on. Seriously, I don’t know what I would do with Tabasco. I love it!
  • Spicy breakfast sausage if you’d like!

nvhowto

  1. Create a baked potato “boat” – cut out a semi-circular section and hollow the inside enough for you to place the egg and fillings inside
  2. Start frying up the the chopped red and green bell peppers, halved grape tomatoes and sliced red onion till soft
  3. Place a tablespoon of butter on the bottom of each potato bowl
  4. Crack 1 egg on top of the butter (I wouldn’t break the yolk) and season to your liking
  5. Top the egg with the rest of the fillings
  6. Sprinkle cheese and dried parsley on top
  7. Cook for 15-20 minutes at 350°

Simple, fast and delicious. Sounds like the perfect breakfast to me… and, trust me, it was!

Lauren

Taxes – Army Style

Taxes. 

Seeing as how Blair had staff duty (a 24 hour shift) yesterday, I had prepared a huge To Do list of things to accomplish. I wanted to get a blog post up, deep scrub the bathroom, reorganize our bedroom closet, maybe take Costello for a walk and get our taxes done. Since I’ve had busier days before, I thought I would be able to pound these things out without a doubt. However, as the day quickly came to an end, I found myself hitting my head against our dining room table out of frustration.

TurboTax Military Edition is free for E1-E5's!

TurboTax Military Edition is free for E1-E5’s!

The day had practically gone as planned until I sat down to do our taxes. Now I’m not too sure if this is embarrassing for me to say or not, but this was my first time actually filing taxes. Before I had always been claimed as a dependent or asked my Dad to file my taxes for me (BTW, thanks Dad!). I had not only watched him file taxes before, but also several other family members – and every time it seemed to be just as easy as “1 – 2 – 3”.

I’m not a number kind of person, but I figured that all I was essentially doing was “copy and pasting”. However, I didn’t take into account how much filing as a newly married military couple would confuse me – and it did just that and more. Again, embarrassingly, I felt like I was having a complete mental breakdown all thanks to filing taxes.

To give you a little bit more background info, I was using TurboTax’s Free Military Edition for (ranks) E-1 to E-5. After doing a little research, I found that there were several different places that would do our taxes for free or had a free diy tax filing program. At Fort Lewis, there is the Tax Center or the H&R Block At Home Online tax preparation is available too, but I found that most people find TurboTax’s edition to be better when it came to getting more tax refunds. And, hey, who doesn’t like more money?!

But here are some Important Things to Know Before Filing Your Military Taxes!

1. Know your Home of Record. In our case, it is actually Blair’s Home of Record because he is the active duty enlisted one. Typically, the Home of Record is going to be the state you lived in when you joined the military – a.k.a. state of residency. So despite currently living in Washington, Nevada is his Home of Record.

*If you aren’t sure, check his LES (Leave and Earning’s Statement) through mypay.gov.

2. Understand and decide whether you will use the Military Spouses Residency Relief Act. This relief act allows military spouses to claim their active duty spouse’s state of residency even if you have PCSed to another state. For me it made sense to keep my residency in Nevada – state taxes are considerably lower there!

3. Make sure you are keeping track of what you can write off!  While many of the tax write offs out there for military service members, veterans and their families may not apply to your life, sometimes they do! So always make sure to do your research to see what is out there! Currently there are tax write offs associated with PCSing costs, uniform costs and more.

*So, Army wives, start keeping all of your receipts associated with any personal military spending right now!!! Next year you’ll be able to add up what you spent out of pocket for things like uniforms. Just make sure you don’t include the uniforms they buy using their annual uniform allowance!

4. Take advantage of the free tax programs out there. Even though I had a difficult time doing ours to begin with, as long as you know and understand terms such as Home of Record and Military Spouses Residency Relief Act, you are set. Why pay when something free is available to you, right?

5. Do your research and be prepared. In the end, I wasn’t able to finish our taxes because I hadn’t done this step. While I had all of Blair’s W-2 information (Army makes this super easy to access through mypay), I didn’t have mine… Major Fail. 😦

*Just so you know, your employer actually has till the end of January to send out W-2’s! Also, 2013’s Tax Deadline is Monday, April 15th!

Despite not clicking the send button on our taxes yet, I still found myself having a productive day, even after all of the frustration and stressing. And to calm myself down after this fiasco, I  got a little crafty/organizational and created February’s Draper Family Newsletter. Now it may seem cheesy, but it is oh so helpful for me – and it was the perfect way to end my day filled with taxes!

Lauren

Our January and February Newsletter. I use templates in Apple's Pages program to create these!

Our January and February Newsletter. I use templates in Apple’s Pages program to create these!

DIY: Carpe Diem Banner

Molly and I at my wedding. I honestly don't know what I would have done without her!

Molly and I at my wedding. I honestly don’t know what I would have done without her!

Seize the day. A while back I headed over to hang out with one of my best friends. Now Molly isn’t any typical best friend – she might as well be my sister and, in fact, I consider her just that. She’s always up for anything. Want to drive? She’s down. Go get fries and a chocolate shake? She’s in her old truck before I know it. Do something crafty with me? She is always there to be my helping hand. So this day was special.

It was beautiful outside; the corn field was bright green with new growth and the sky had the most perfect clouds floating around it.  I was instantly inspired and wanted to make something to remember the day – or rather seize the day. So Molly and I decided to make a burlap banner. While those are pretty popular right now, ours ending up being a little different (Just like us. 😉 ) We didn’t want straight perfect edges or the seam of the burlap flags to fold perfectly over the twine. We wanted it to be bold, crisp and bright.

To get just that, we started with all of our supplies:

    • 2 yards of cream colored Burlap (how much will really depend on what your banner will say or how long you want it)
    • A flag stencil (make a triangle like shape onto a plain piece of printer paper then trace onto cardboard and cut it out)
    • Parchment paper
    • Printed out letters (make sure they are the size and font that you want!)
    • Pencil
    • Scissors/Exacto knife
    • Ruler
    • Scotch tape
    • Acrylic paint (we used gold and loved it)
    • Foam brush
    • A roll of twine (again, how much depends on how long your banner ends up being)
    • Hot glue gun
banner2

Before getting started, take your burlap, trace your flag stencil onto it and cut out your flags!
Steps 1 -4:
1. Print out your letters in the font you want and in a size that will fit perfectly in the middle of the burlap flag.
2. With a ruler, take a piece of parchment paper and divide it into even cube sections by drawing lines, then lay a letter underneath a section and trace.
3. Cut the cube sections to separate them, then use an Exacto knife to cut out the inside of the letter – this will then become your stencil.
4. Using tape along with a firm hand, hold the stencil down on a flag and dab your foam brush with paint onto the burlap. I placed mine on top of cardboard so I wouldn’t get paint on the countertop.
*It is important to make sure a letter’s placement on the flag is centered otherwise it might end up being crooked. Also, do not do a sweeping motion with the foam brush on the burlap! The texture along with a dabbing motion is the key to a perfectly stenciled letter.

banner3

Steps 5-7:
5. Let the flags dry long enough for the paint to dry stiffly.
6. Lay the flags out in the order you want them in. 
7. One by one, add a strip of hot glue to the back of the flag (an inch or so off of the top edge) then attach the twine. *Make sure to leave enough twine at the end to be able to hang it up!

banner5

And here it is – the Final Product!

Just remember to have fun and not stress about it being perfect. After all, it’s homemade – not a cookie cutter buy from the store!

Lauren

My Treat: Brookies

Brookies.

They are delicious, brown-sugary, chocolate-chippy, chewy-gooey cookie brownies. So, in other words, mouthwatering.

While I wouldn’t necessarily recommend brookies for a wedding (they can get a little messy), they are perfect for a bridal shower or even as a cute thank you gift for close friends and family after the wedding has happened!

I made these brookies for my boyfriend’s dad’s “23rd” birthday.  😉  And considering they were gone before I knew it, I’m taking they were a huge hit for their family and would be for yours too!

Now with all of the ingredients on hand, let’s get to baking!

Isn’t that a beautiful color? Cannot wait to eat this!

I added the dry ingredients in bits so they didn’t fly everywhere when I turned the mixer back on.

DON’T forget to scrape the sides! Nobody wants left over flour clumps when they’re trying to enjoy their brookie.

The dough should be a beautiful golden color with plenty of chocolate chips!

My friend Julia and I had such a hard time resisting the brookie dough……. but we survived the temptation!

Final Product!!

Delicious and beautiful. It’s the perfect combination!

Blog Queen Bakerella shared this recipe last May. While she suggested mixing the batch up by hand to make the texture “better”, I went ahead and just whipped up the quick recipe in the mixer. I found the final product to be perfect for my taste, but included the “By Hand” instructions for you to try out in case you wanted to experiment with different mixing avenues! Best of luck in your baking!

Brookie Recipe:

2 3/4 cup all-purpose flour

2 1/2 teaspoons baking powder

1/2 teaspoon salt

2/3 cup butter, softened

1 lb. light brown sugar

3 eggs

1 1/2 teaspoon vanilla (The original recipe called for only 1 teaspoon, but I love vanilla so I added more!)

11.5 ounce package milk chocolate chips (Why not just throw in the whole 12 oz bag?!)

1 cup chopped pecans (Yes please!)

By mixer:

Sift flour, baking powder and salt in a large bowl. Set aside.

Combine butter and sugar using a mixer until blended.

Add eggs, one at a time to sugar mixture, mixing on low in between each addition.

Add vanilla and mix.

Add flour and mix until combined.

Stir in chips and then pecans.

By hand:

Sift flour, baking powder and salt into a large bowl. Set aside.

Stir brown sugar into softened (not melted) butter in another large bowl until butter disappears.

You can use the back of your spoon to help incorporate the two together.

Add eggs one at a time to butter mixture and stir well after each egg.

Add vanilla, chocolate chips and nuts.

Mix well.

Add dry flour mixture and stir until well combined.

-Coat a 13 X 9 pan with non-stick spray and spread batter evenly into dish. Bake at 350 degrees for 30 minutes or until top is golden brown. Make sure you don’t over bake.

**My oven cooked the brookies perfectly in 30 minutes, but make sure you know your oven… If your oven runs on the cooler side and the top of your brookies are already golden brown, but the inside isn’t cooked yet, just throw on a sheet of aluminum foil and bake until a toothpick comes out clean! I like my cookies on the doughier side so I made my brookies that way too! It is all up to you though on that aspect!

…and they lived happily ever after.

❤ Lauren