A.k.a. Pace Counters.
Since moving to Washington, I’ve realized that most people up here consider 50 degrees outside to be practically summer. I never understood this until recently though when the clouds split, the sun came out and the air was crisp, yet warm. It was an absolutely beautiful day and the perfect temperature to go hiking.
While I ended up staying inside doing some much needed laundry, I decided that next time the sun came out and the weather was nice that I would be prepared. So that next weekend, Blair and I made some pace counters for us to use when we do decide to go out on a hike.
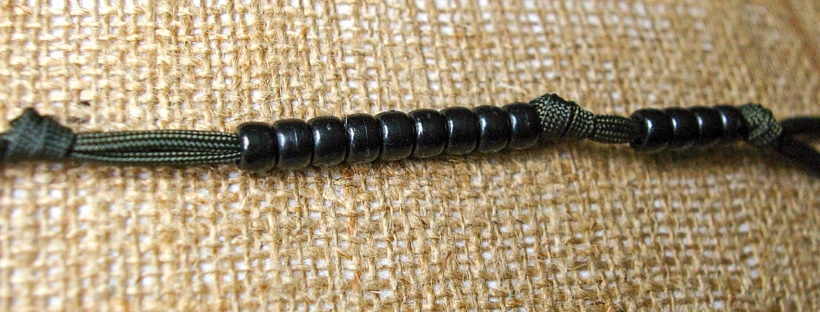
To Army guys, pace counters are also known as Ranger Beads. When going out on their 4+ kilometer ruck marches, Ranger Beads help them keep track of how far they have gone and how much farther they may have to go. At a Army surplus store, these little guys can cost up to $13, where as this DIY comes out to be about $1 a piece. Talk about a bargain, right?!
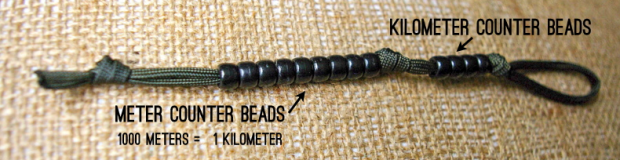
The quick explanation on how to use a pace counter goes like this: There are 1000 meters to every kilometer – so every 100 meters you walk you would slide a meter bead down to the bottom. When you get to the point that you would slide the “10th bead” down, you have gone a kilometer! So go ahead and slide 1 kilometer bead down, and reset your meter beads back to the top.
*While dependent on the length of your stride, my husband and his buddies average about 65 steps per 100 meters (1 meter bead).
**There IS NOT a 10th meter bead! But when it is time to pull that “10th bead” down, you are going to pull a kilometer bead down. So, 10th bead = 1 kilometer bead!
To make these, you’ll need:
- 550 Chord (a.k.a. Parachute Chord) divided into 25 in. sections (remove the white inner strings to make it less bulky)
- 13 Black Pony Beads
- Tweezer
- Scissor
- Lighter
- Ruler
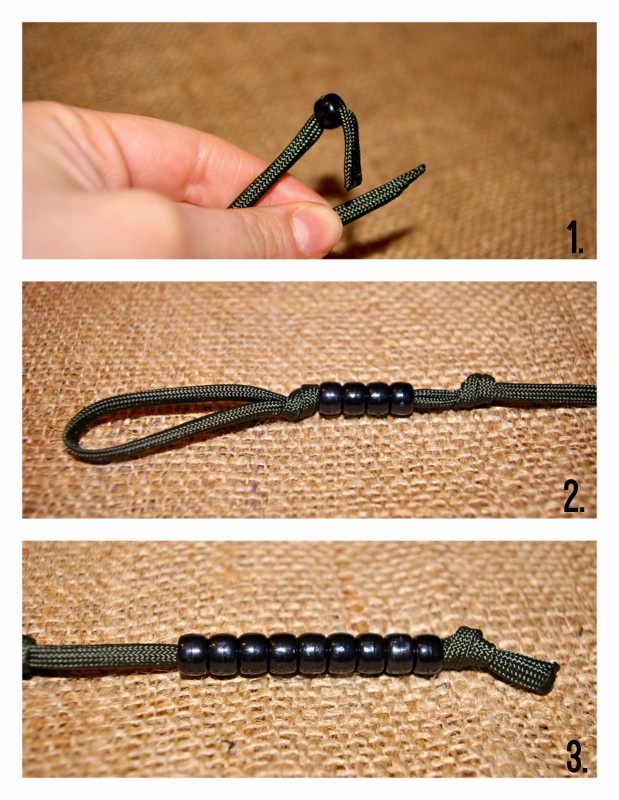
After folding a 25 inch piece of 550 chord in fold in half, make a knot about an inch down. *This will make the loop for you to be able to hang it on belt loops or ruck sacks.
- Step 1.Then take the ends and cut them at a narrow angle. You’ll want to carefully reconnect the loose strings of each end by warming it with a lighter and pressing it firmly together with your fingers. *TIP: Make sure to not cut too much away from the ends – you’ll need all of the chord!
- Step 2. Add the 4 kilometer beads and knot the section off. Leave enough space to slide the beads up and down and to be able to tell which ones you have slid down already! *TIP: Use the tweezers to pull the chord ends through the bead.
- Step 3. Add the 9 meter beads. Again, leave space to be able to slide them up and down. Then finalize the whole thing off with the last knot.
*TIP: Sway the lighter under each knot as you go to tighten the knot. Since the 550 chord shrinks under heat, this will prevent the knots from ever moving!
This is one of those DIY’s that the second one is always better, so don’t worry if the first one isn’t perfect. With the cost of all the supplies being so cheap, practicing on the first one won’t make you bankrupt! I’m excited to make some for myself that aren’t so Army-ish – maybe a pink one or something like that. But in the end all I can say is that I’m really looking forward to the sun coming out one of these weekends so I can try this little guy out with Blair on one of the many Washington hiking trails nearby!
Lauren
*This post was influenced by Army Ranger Beads on instructables.com.